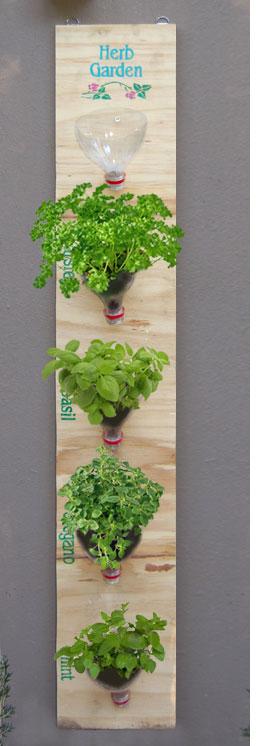
Check out this super simple (and cool) plywood vertical garden. You might even be able to make it using materials you already have and just recycle them!
When I saw this home-made vertical garden, I was impressed because of its simplicity – yet it looked very functional and easy-to-make. As you can see, it’s basically made with a piece of plywood and cut-up plastic soda bottles. Brilliant!
What a great idea to use as a vertical herb garden – but there’s no reason why you couldn’t plant regular plants like annuals, perennials or plain old greenery. Plants that grow big and bushy can hide the plastic bottle planters completely (ie spider plants), and if you paint the plywood backing, people might never even notice that your unique living wall garden is homemade…
Even though this planter has a single column of 5 growing containers, there is no reason why you couldn’t take this concept and use a wider with several columns and rows of plants. Now that could be a really gigantic herb garden that requires no backyard.
Another idea is to make this an indoor vertical garden similar to the indoor pocket planter idea, but handcrafted. The instructions below include the soda bottles without the caps, allowing for drainage. However, if your plants don’t require drainage and you’d like to hang your garden indoors, you could always leave the caps on…
Materials Needed:
- A piece of plywood cut to the size you want
- Empty 2-liter plastic bottles (water bottles, soda bottles, whatever)
- Small screws or tacks
- Weed fabric of netting
- Potting soil and plants
Optional:
- Sandpaper (if you want to sand the wood)
- Paint or stain (if you want to paint or stain the wood)
- Picture hooks and concrete nails (if you want to hang your planter on a wall)
As you can see, you don’t need many materials, and some of them you might already have. You don’t even have to hang your garden – as plywood can easily be leaned up against a wall or sturdy fence.
5 Steps to Make Your Homemade Vertical Garden:
1. The first step is to prepare your wood back frame by cutting, sanding and staining/painting it. Add the picture hooks as well and test out where you want to position your vertical garden.
2. Second, cut off the top third or half of the plastic bottles to be used to hold your plants. Scissors work fine, or you can use a utility knife too. The size you make your planters will depend mainly on the size of your plants – and how much space they need for their roots.
3. Third, fasten the newly-cut bottle planters to the plywood back using the screws or tacks. One screw will work fine, but using 2 will make it more secure and hold the containers in place better.
4. Fourth, cut a small square (or circle) of weed fabric or netting to cover the base of the bottle. I’d say about 4″ x 4″ would work fine. This will prevent soil from falling out the bottom of the bottle planters.
5. Fifth, fill the bottles with soil and plants, leaving a small space at the top so that water doesn’t automatically overflow when the plants are watered. Say a 1/2 inch or so.
That’s it! Of course, if you want to make your planter larger or more fancy, go for it! You can even make multiple columns and position them side-by-side along a wall to create a sophisticated stylish design.